Sunday, January 8, 2017

Knit Washcloths


Not to toot my own horn, but I can knit pretty much anything. Cables and fair-isle, socks and mittens, sweaters and hats. I was lucky and learned when I was in third grade in an after school enrichment program, so when I picked it up again three or four years ago I sort of sped to the front of the class (along with my BFF Corinne. Hi Corinne!! 😘.) We busted through a few dishcloths, but were pretty quickly on to bigger projects.

I was at Joann Fabrics a few months before I got married, so about three years ago, and saw the cover of Vintage Design Workshop, by Geraldine Warner. It's worth looking at, but I'm not reposting it here because I don't know if I'm allowed to and I'm not letting anything hurt my chances at my own daytime TV show (or my 2032 presidential run.) The cover showcases this really cool 1950s short sleeve sweater that made me swoon, but I didn't remember enough about knitting to really do anything about it. So I put out an emergency status on Facebook that I needed to learn how to knit. I was actually looking to pay someone for lessons (BECAUSE CRAFTING IS A SKILL AND AN ART AND WE DESERVE PAYMENT AND WE'RE NOT JUST FREE THING FACTORIES) but I was lucky to have a friend's mom (Thanks Mrs. Whitehouse!!) volunteer to just do it out of the kindness of her heart, which is kind of amazing giving the life changer it was for me.

But that was kind of a digression. Here we are, 2017, and I can knit pretty much anything. BUT. I don't. Dishcloths remain a personal favorite. People sometimes make fun of me when they see me knitting one, but that's fine. My friend Matt and I were making hemp bracelets once and he said something along the lines of, "People might make fun of me for learning how to make hemp bracelets, but whatever, you're sitting over there being mean and I have a new skill." I think it may have involved more colorful language but I'm keeping this blog family friendly. So anyway, don't let anyone stop you from knitting cotton squares if that's what you want to do. When the apocalypse comes, everyone in my compound will have washcloths and homemade soap. (Soap will be another post so your compound can be clean as well.)

Here's the deal with these squares for the uninitiated: you go to the store, get some Sugar and Cream cotton yarn, and knit it on some pretty big needles. (7 or 8 or 9). You can use them to dry dishes, wipe down your counter, as a trivet, or like I use mine, in the shower! (Ooh lala!) They're pretty scrubby and exfoliating and I need that since I'm part knitter but also part molting cryptid reptile woman.

If you don't know how to knit yet, this is a great place to start. In a future post, I could show you the bias-knit dishcloth pretty much everyone learns first and it barely even has a pattern and eventually you just memorize it and keep some cotton yarn and needles in your bag in case you get stuck somewhere where you need to knit. But this weekend I decided on our drive to Rhode Island (oh yeah, I went to Rhode Island!) I'd work on this Lily's Sugar and Cream pattern I'd had my eye on: Raindrop Dishcloth. (Or as I like to call it, Tears of My Enemies Dishcloth) This is for someone who knows at least basic knitting. Pattern is free though and you probably already have the needles and ten pounds of cotton yarn, if you're anything like me.

I finished it up last night! It probably took about 6 hours total, maybe less. I am going to start timing my knitting but not today.

I actually think mine looks better than the examples they give on the website...
Want to hire me, Sugar and Cream?!
I think part of the reason why my sample is more square than the samples on the original pattern is that I used my favorite trick. At the beginning of every row, I slipped one stitch purlwise, brought the yarn over to the back, and then continued knitting in pattern.

LOOK AT THAT EDGE.
SOMEONE HIRE ME TO BE A TEST KNITTER.
Honestly, I don't know why EVERY pattern doesn't include that stitch. I can't think of a reason not to slip the first stitch, especially if you're going to have edges exposed. Even if they won't be visible, it makes joining easier as well.

In addition to being really cute, those little eyelets in the raindrops really catch the water to make suds!

Harder to capture bubbles on camera than I thought.
But they're there.
If you happen to have some homemade soap around to test your washcloth with, even better! After the trial run, my raindrops were a little stretched out but actually that even made them look nicer (I think so at least and it's my blog.)

Drops are much more defined after a dip!
I don't know if anyone actually uses them, but these are definitely one of my go-to gifts. I like that they're quick and you can experiment with patterns. If you are a beginner and you mess up, it's not a huge emotional or monetary investment. Just use it to mop up spills in the kitchen and you won't even care about the dropped stitches.

If knitting seems like something you'd be interested in, but you don't know where to start, I suggest doing what I did and putting it out there on social media. You may not get as lucky as I am to get someone volunteering to help you learn for free, but you will probably find someone willing to do it for money, beer, or pictures of cats. Also someone might make fun of you for learning to knit, but they're just jealous they don't have the drive to learn a new skill. You might also try reaching out at work. We have a knitting circle that's just getting started up, and we were surprised at the interest!

In closing, here is a behind the scenes look at my cat watching Brett take pictures of me trying to make lather in the sink, and wondering what weird stuff the humans are into now.

You people are sick.


Monday, January 2, 2017

The (First?) Homemade Loom


So, I accidentally fall into a lot of my crafts. I'm a pretty scatterbrained person, and I think that's because there's about fifty tabs open at any time in my head. The eighth graders and I were talking about togas, which were made from twenty feet or so of hand woven fabric. I don't know if it's because of Snapchat and iPads and "kids these days" but they really didn't have a great grasp on weaving. (Then again, I probably have a better grasp on handicrafts than most people.) So, after seeing a painting of Penelope weaving while waiting for Odysseus to get home, the kids asked if we could learn to weave. (They also wanted to spin wool, but that's another blog post for another day.) ANYWAY, I remembered that we learned how to weave on cardboard in third grade, and so the week before break we worked on weaving tiny rectangles on pieces of cardboard. As a side note, you may think you are a kind and patient person, but if you try to teach 30 eighth graders to weave, you will learn that you are cruel, unsympathetic, and mean. However, the kids did seem to have fun.

I never actually got to finish this sample because... 8th graders.
(Best moment was when a student asked how Romans sewed all these tiny pieces together to make a toga... That led to a quick review on the difference between Roman looms and ours.)

So, this got me Pintering (Katius Rex) and after clicking through a few big looms I knew I would never make or buy (because lets be honest, weaving is a tiny bit limited compared to knitting or crocheting) I discovered the mini-loom "Weave-It," and became enamored of the little mid-century gem...


I'll make a different post about that later, because it deserves its own. To sum it up, it's a small 4x4 loom that makes little squares. What are you going to do with those little squares? A) I have no idea but they are very calming to make, and B) there's a great website, if you're interested in this tiny loom, that has all kinds of info and patterns:  Eloomanation


After making about ten / a million of these little squares, I started thinking that they could probably be used the way granny squares are -- bags, accessories, and of course ... AFGHANS. So, Christmas night after we got home from my brother's but we were still waiting for my husband to get home from work I showed my dad the Weave-It, and asked if he could cut me some wood to make a bigger one.

He asked what size and I said I needed the middle opening to be about twelve inches, because I figured I'd make twelve inch squares. This would make sizing blankets easy (five squares, five feet) and since it's a multiple of 4, I figured the pin arrangement would be easy. (That's the cool thing about the Weave-It -- that pin arrangement gives it a neat scalloped edge and makes warping it easier.) He cut a square out of one piece of plywood, so there were no joints at the corner to contend with. (Although probably not the best use of wood if you're trying to conserve?)

Dad goes into action.
So, and honestly I don't even remember how we got to this point, we didn't quite end up with a square foot. The interior square came out 10 and 1/8. To figure out where to place the pins, I measured a square a little over 11 inches around the edge, a little over 29 centimeters. Huh.

Hmmm.
So the crux of the matter was: what am I going to do about the correct spread of pins? If you are trying this on your own at home and DON'T care about having the Weave-It pattern of pins (the corners are a little strange, which is the real difficult part) you can just figure out your spacing (4 or 5 MM?) and divide the length of your pencil line (29 cm here) and there ya go. HOWEVER, I was enchanted by the scalloped edge that the Weave-It makes, so my method is as follows. Note: I don't know if this is actually logical but my loom makes really good squares so there you have it. Another note: I did do a crap load of sanding on that square that I forgot to mention. You don't want to weave on raw plywood you silly.

1. I counted up the number of Weave-It pins on each side, as well as SPACES. (I counted each space as 1.) 32 total.

2. The next problem I faced was I was pretty sure I couldn't just enlarge the scale of the Weave-It. 290 mm divided by 32 would be 9 mm, or almost a whole centimeter. Also yes, I switched to metric halfway through. Did I mention that?

3. So then I multiplied 32 by 2 to get 64. Fantastic. NOT! Nails ended up way too crowded.

4. Now this is the part that I'm not sure if it makes sense, but I got lucky. I multiplied that 32 by 1.5, and ended up with 48 So I divided 290 mm by 48 and got 6 mm.

5. So, starting with the number 1 corner on the Weave-It (Weave-It corners are numbered) I copied the pattern of pins all the way across, again, making sure to have the funky corners right. In between those corners, it's just a repeating pattern of groups of three. 6 mm between each nail, and 12 mm for the spaces between triads. I ended up with 11 groups of three in between each funky corner group. That's my cat helping me. I forget which one. We have two black cats because we're spooky. Also one of the cats is named Spooky. (The other one is Eerie. He's the worst/best you'll see him soon.)

Advanced envelope measuring technique.

6. Next I broke out the dremel. Well, my husband broke it out and we didn't have the right attachment but through the magic of blogging we can fast forward you through like three hours of getting dressed and walking around Home Depot and then I made a cactus planter BUT THEN I came back to this. Drill all the little holes. I think we used a 3/64 bit; I'll double check with Brett later. As a side note using the dremel is both fun and horrific and makes you feel like a dentist.

Action shot!
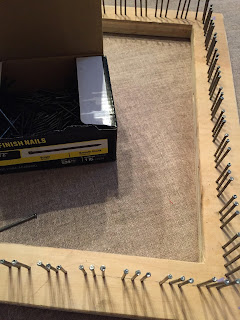
 7. Then you hammer a bunch of nails in! I got a big box of finishing nails at Home Depot because I wasn't sure how many I needed because at that point I hadn't counted up the holes yet and also idk giant box of nails now we have them forever I don't come into your home and judge your nails. My plywood square was 3/4 an inch thick and we got 1.5 inch nails. Our dremel guide didn't fit over the attachment to use the tiny bit so we just estimated how far into the wood we were going. Everything went fine, don't worry.

Giant box o nails.
And after a LOT of hammering... IT WAS DONE!


The squares off this slightly irregularly measured loom are about 10.5 inches. (Oh no back to imperial!) I used two strands of worsted weight. If you are one of those people who likes "measurements" and "takes pride in your work" you may want to be a little more exact than I was. Long story short: the finished square is beautiful, I can't wait to make blankets.

Saturday, December 31, 2016

The First Post

If you're talking to me, and it looks like I'm not listening, I'm probably not. I teach Latin and that's about all I'll say about that, except for, my brain is usually a millennium behind the rest of me. If you have to ask why I'm making things all the time, this probably won't be the blog for you. I'm obsessed with kitsch and crafts of the 30s through the 70s.

My goals for this blog include: showing people how to make things, showing people how I make things, learning how people make things, keeping the existential dread at bay, and getting on a talk show to teach people how to make things. I'm thinking my Pipe Cleaner Christmas Sprites (and Cats) would be the logical first step, but honestly, I'll teach you how to make anything. I just want to be on TV. (Short of TV I will also accept a book deal or a feature in a magazine.)

You can expect okay directions, reasonable photos, and variety. There'll be fermenting vegetables, fortune telling, homemade cat toys, a garden in the spring, brewing beer, soap making, sewing and knitting and crocheting and -- as of late! -- weaving.

You probably know me from high school or college or you're a friend of my mom. WELCOME! A psychic at a party said this was all going to go really well, by the way, if that helps. Tomorrow you can learn how to make a pin-loom from the okayest blogger around.